找到
3
篇与
Linux
相关的结果
-
 扩容刚安装完毕的OpenWRT文件系统 查看当前文件系统 root@localhost:~# df -h Filesystem Size Used Available Use% Mounted on /dev/root 102.3M 64.9M 35.4M 65% / tmpfs 994.6M 2.4M 992.2M 0% /tmp /dev/sda1 15.7M 6.2M 9.2M 40% /boot /dev/sda1 15.7M 6.2M 9.2M 40% /boot tmpfs 512.0K 0 512.0K 0% /dev安装完OpenWRT之后,可以看到根文件系统只有102M左右,这明显是不够的,需要进行扩容 第一步:分区扩容 执行以下命令来扩容分区 root@localhost:~# opkg update root@localhost:~# opkg install parted root@localhost:~# echo fix | parted -l ---pretend-input-tty root@localhost:~# parted -s /dev/sda resizepart 2 100%第二步:扩容文件系统 执行以下命令来扩容文件系统 root@localhost:~# opkg install losetup root@localhost:~# losetup /dev/loop1 /dev/sda2 root@localhost:~# resize2fs -f /dev/loop1 root@localhost:~# reboot最后可以看到扩容之后变为了15G左右大小 root@localhost:~# df -h Filesystem Size Used Available Use% Mounted on /dev/root 14.7G 224.5M 14.4G 1% / tmpfs 994.6M 2.4M 992.2M 0% /tmp /dev/sda1 15.7M 6.2M 9.2M 40% /boot /dev/sda1 15.7M 6.2M 9.2M 40% /boot tmpfs 512.0K 0 512.0K 0% /dev
-
OP将uhttpd替换为Caddy 下载 Caddy 由于OpenWrt官方软件库中没有Caddy软件包,故去Caddy官网下载软件,并放到 /usr/bin 下,一定要选择Caddy自定义插件中的“aksdb/caddy-cgi/v2”,其他可根据情况选择 创建配置文件 mkdir /etc/caddy touch /etc/caddy/Caddyfile touch /etc/caddy/ubus.sh chmod +x /etc/caddy/ubus.sh vim /etc/caddy/Caddyfile vim /etc/caddy/ubus.shCaddyfile写入以下内容: { order cgi before respond } localhost, 192.168.1.1, router, router.home { tls internal root * /www file_server cgi /cgi-bin/cgi-backup* /www/cgi-bin/cgi-backup { script_name /cgi-bin/cgi-backup } cgi /cgi-bin/cgi-download* /www/cgi-bin/cgi-download { script_name /cgi-bin/cgi-download } cgi /cgi-bin/cgi-exec* /www/cgi-bin/cgi-exec { script_name /cgi-bin/cgi-exec } cgi /cgi-bin/cgi-upload* /www/cgi-bin/cgi-upload { script_name /cgi-bin/cgi-upload } cgi /cgi-bin/luci* /www/cgi-bin/luci { script_name /cgi-bin/luci } cgi /ubus* /etc/caddy/ubus.sh { script_name /ubus } }ubus.sh写入以下内容: #!/bin/sh [ "$REQUEST_METHOD" != "POST" ] && printf 'Status: 405\r\n\r\n' && exit access() { local sid=$1 local obj=$2 local fun=$3 local req=$(printf '{ "ubus_rpc_session": "%s", "scope": "ubus", "object": "%s", "function": "%s" }' "$sid" "$obj" "$fun") local res=$(ubus call session access "$req" | jsonfilter -e '@.access') [ "$res" = "true" ] } error() { local code=$1 local mesg=$2 printf '{ "jsonrpc": "2.0", "id": "%s", "error": { "code": %d, "message": "%s" } }' \ "${RPC_ID:-null}" "$code" "$mesg" exit 1 } process() { local request=$1 # - use `VAR=expr` notation to let it create shell compatible export statements # - eval result to import variables eval $(jsonfilter -s "$request" \ -e 'RPC_ID=@.id' \ -e 'RPC_VERSION=@.jsonrpc' \ -e 'RPC_METHOD=@.method' \ -e 'RPC_SESSION_ARG=@.params[3].ubus_rpc_session' \ -e 'UBUS_SID=@.params[0]' \ -e 'UBUS_SERVICE=@.params[1]' \ -e 'UBUS_CMD=@.params[2]') # verify JSON-RPC framing if [ -z "$RPC_ID" ] || [ "$RPC_VERSION" != "2.0" ]; then error -32600 "Invalid request" fi # reject invalid values to prevent shell injection case "$RPC_ID$UBUS_SID$UBUS_SERVICE$UBUS_CMD" in *[^a-zA-Z0-9_.-]*) error -32600 "Invalid request" ;; esac case "$RPC_METHOD" in call) UBUS_PAYLOAD=$(jsonfilter -s "$request" -e '@.params[3]') # ensure that payload is a dictionary or empty case "$UBUS_PAYLOAD" in ""|{*}) : ;; *) error -32602 "Invalid parameters" ;; esac # merge ubus_rpc_session parameter if [ -z "$UBUS_PAYLOAD" ] || [ "$UBUS_PAYLOAD" = " " ]; then UBUS_PAYLOAD=$(printf '{ "ubus_rpc_session": "%s" }' "$UBUS_SID") else UBUS_PAYLOAD=$(printf '{ "ubus_rpc_session": "%s", %s' "$UBUS_SID" "${UBUS_PAYLOAD#\ ") fi # reject requests with embedded ubus_rpc_session if [ -n "$RPC_SESSION_ARG" ]; then error -32602 "Invalid parameters" fi # check access if ! access "$UBUS_SID" "$UBUS_SERVICE" "$UBUS_CMD"; then error -32002 "Access denied" fi ubus_reply=$(ubus call "$UBUS_SERVICE" "$UBUS_CMD" "$UBUS_PAYLOAD") ubus_status=$? printf '{ "jsonrpc": "2.0", "id": "%s", "result": [ %d, %s ] }' \ "$RPC_ID" "$ubus_status" "${ubus_reply:-null}" ;; list) RPC_PARAMS=$(jsonfilter -s "$request" -e '@.params') # ensure that payload is an array or empty case "${RPC_PARAMS:-[ ]}" in \[*\]) : ;; *) error -32602 "Invalid parameters" ;; esac # empty payload should result in list of services if [ "${RPC_PARAMS:-[ ]}" = "[ ]" ]; then services='' for service in $(ubus list); do services="${services:+$services, }\"$service\"" done printf '{ "jsonrpc": "2.0", "id": "%s", "result": [ %s ] }' \ "$RPC_ID" "$services" # list of services should result in { service => { method => signature } } replies else signatures='' eval $(jsonfilter -s "$RPC_PARAMS" -e 'indexes=@') for i in $indexes; do service=$(jsonfilter -s "$RPC_PARAMS" -e "@[$i]") signature='' IFS=$'\n\t' for line in $(ubus -v list "$service" | tail -n +2); do signature="${signature:+$signature, }$line" done IFS=$' \n\t' signatures="${signatures:+$signatures, }\"$service\": { $signature }" done printf '{ "jsonrpc": "2.0", "id": "%s", "result": { %s } }' \ "$RPC_ID" "$signatures" fi ;; *) error -32601 "Method not found" ;; esac } # - read body from stdin (either an object or array) # - process each item if it is an array body=$(cat) type=$(jsonfilter -s "$body" -t '@') printf 'Content-Type: application/json\r\n\r\n' if [ "$type" = "array" ]; then first=true printf '[' jsonfilter -s "$body" -e '@.*' | while read request ; do # join response with ',' and the first should be omitted if ! $first; then printf ',' else first=false fi # process each request process "$request" done printf ']' else process "$body" fi配置系统服务 touch /etc/init.d/caddy chmod +x /etc/init.d/caddy vim /etc/init.d/caddycaddy写入以下内容: #!/bin/sh /etc/rc.common PROG=/usr/bin/caddy USE_PROCD=1 # starts after network starts START=21 # stops before networking stops STOP=89 start_service() { procd_open_instance procd_set_param command "$PROG" run --config /etc/caddy/Caddyfile --adapter caddyfile procd_set_param stdout 1 procd_set_param stderr 1 procd_close_instance }设置开机自启 # 停止并删除uhttpd服务 service uhttpd stop service uhttpd disable # 添加并启动Caddy服务 service caddy enable service caddy start # 查看Caddy服务状态 netstat -lnpt | grep -e 80 -e 443卸载uhttpd软件包(可选) opkg remove uhttpd --force-removal-of-dependent-packages
-
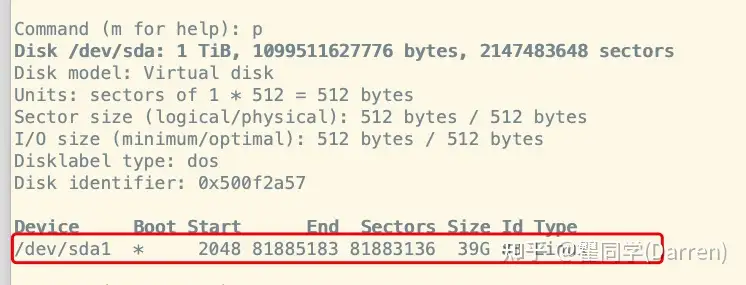
Debain12.5 扩容分区 背景 如何对 debain12.5 已分区的磁盘进行分区扩容?一下内容将演示如何将已分区的40 GB 磁盘扩容为1 TB 系统介绍 查看 debain 版本,笔者的系统为 debain12.5 使用命令查看 cat /etc/debian_version root@localhost:~$ cat /etc/debian_version 12.5查看磁盘信息 通过 df -h 输出当前磁盘分区大小 root@localhost:~$ df -h Filesystem Size Used Avail Use% Mounted on udev 7.9G 0 7.9G 0% /dev tmpfs 1.6G 616K 1.6G 1% /run /dev/sda1 40G 10G 30G 25% / tmpfs 7.9G 0 7.9G 0% /dev/shm tmpfs 5.0M 0 5.0M 0% /run/lock tmpfs 1.6G 0 1.6G 0% /run/user/1000通过 fdisk -l 输出所有的磁盘和磁盘分区的详细信息 root@localhost:~# fdisk -l Disk /dev/sda: 1 TiB, 1099511627776 bytes, 2147483648 sectors Disk model: Virtual disk Units: sectors of 1 * 512 = 512 bytes Sector size (logical/physical): 512 bytes / 512 bytes I/O size (minimum/optimal): 512 bytes / 512 bytes Disklabel type: dos Disk identifier: 0x500f2a57 Device Boot Start End Sectors Size Id Type /dev/sda1 * 2048 81885183 81883136 39G 83 Linux /dev/sda2 81887230 83884031 1996802 975M 5 Extended /dev/sda5 81887232 83884031 1996800 975M 82 Linux swap / Solaris在本例中磁盘扩展后我们有一个大小为 1 TB 的磁盘 /dev/sda ,它分为3个分区: /dev/sda1 、 /dev/sda2 和 /dev/sda5 。其中,我们对 Linux 类型的 /dev/sda1 感兴趣。 查看分区 我们不能只扩展 /dev/sda1 分区,因为后面紧跟着 sda5 。因此,首先需要将其移动到磁盘的末尾(添加的扇区所在的位置),然后才扩展 sda1 本身。但是,如果 fdisk 输出中只有一个分区,或者其它分区位于于磁盘的末端(查看末端扇区),则可以直接转到扩展分区章节。 下图所示只有一个分区: 1图片 下图所示只有两个分区且交换分区在末尾: 2图片 修改交换分区 交换分区介绍 来自GPT的解释 : Linux 交换分区的主要作用是提供额外的虚拟内存空间,以便系统在物理内存( RAM )不足时能够继续正常运行。当系统中的 RAM 用尽时,操作系统可以将部分不常用的数据移到交换分区,从而释放 RAM 供更重要的任务使用。 以下是 Linux 交换分区的一些作用和优势: 扩展内存容量 : 交换分区允许系统将不常用的数据页面移到磁盘上,以释放物理内存,从而扩展可用的内存容量。这对于运行大型应用程序或执行内存密集型任务的系统特别重要 提高系统稳定性 : 如果系统中的所有物理内存都被使用完毕,而没有交换分区可用,系统可能会崩溃或变得非常缓慢。交换分区允许系统在需要时延展其内存,提高系统的稳定性和性能 支持休眠功能 : 交换分区对于系统的休眠( hibernation )功能也很重要。当系统休眠时,当前的系统状态被保存到交换分区中,以便在下次唤醒时恢复到先前的状态 缓解内存泄漏 : 如果某个进程出现内存泄漏,逐渐占用所有可用内存,交换分区可以用作缓冲区,防止系统因内存耗尽而崩溃 虽然交换分区对于提高系统性能和稳定性非常有用,但在一些情况下,如果系统有足够的物理内存,交换分区的使用可能会较少。在某些情况下,也可以使用交换文件替代交换分区。总体而言,合理配置和使用交换分区有助于优化系统的内存管理。 关闭交换分区: root@localhost:~# swapoff -a删除交换分区 运行 fdisk 指定磁盘 /dev/sda fdisk /dev/sda root@localhost:~# fdisk /dev/sda Welcome to fdisk (util-linux 2.36.1). Changes will remain in memory only, until you decide to write them. Be careful before using the write command. 注意:fdisk 需要小心使,要知道,在保存更改之前,您始终可以退出而不会产生任何更改。 我们输入 p 查看分区列表: Command (m for help): p Disk /dev/sda: 1 TiB, 1099511627776 bytes, 2147483648 sectors Disk model: Virtual disk Units: sectors of 1 * 512 = 512 bytes Sector size (logical/physical): 512 bytes / 512 bytes I/O size (minimum/optimal): 512 bytes / 512 bytes Disklabel type: dos Disk identifier: 0x500f2a57 Device Boot Start End Sectors Size Id Type /dev/sda1 * 2048 81885183 81883136 39G 83 Linux /dev/sda2 81887230 83884031 1996802 975M 5 Extended /dev/sda5 81887232 83884031 1996800 975M 82 Linux swap / Solaris这里我们对磁盘上的扇区总数( 2147483648 )和要交换的扇区数( 1996800 )感兴趣。请注意分区 /dev/sda2 (它是自动创建的)没有里面文件我们将删除它。 删除交换分区 5 和逻辑分区 2 (命令 d ): Command (m for help): d Partition number (1,2,5, default 5): 5 Partition 5 has been deleted. Command (m for help): d Partition number (1,2, default 2): 2 Partition 2 has been deleted.然后执行 p 查看结果,此时只剩下一个分区。 Command (m for help): p Disk /dev/sda: 1 TiB, 1099511627776 bytes, 2147483648 sectors Disk model: Virtual disk Units: sectors of 1 * 512 = 512 bytes Sector size (logical/physical): 512 bytes / 512 bytes I/O size (minimum/optimal): 512 bytes / 512 bytes Disklabel type: dos Disk identifier: 0x500f2a57 Device Boot Start End Sectors Size Id Type /dev/sda1 * 2048 81885183 81883136 39G 83 Linux新建交换分区 现在,让我们在磁盘末尾重新创建交换分区。使用 n 创建新分区,如果你的内存够大可以考虑不启用交换分区,可以跳过此步骤: Command (m for help): n Partition type p primary (1 primary, 0 extended, 3 free) e extended (container for logical partitions) Select (default p): e Using default response p.您将被要求为创建的 /dev/sda2 选择分区类型。选择逻辑 e : 指定分区 2 的序列号: Partition number (2-4, default 2): 2接下来,您需要指示第一个扇区。如果我们想保持交换大小不变,那么从磁盘 /dev/sda 的最后一个扇区( 2147483648 )减去分区 /dev/sda2 的扇区大小( 1996800 )为默认值,得到 2145486848 : First sector (81885184-2147483647, default 81885184): 21454868483图片 指定磁盘的最后一个扇区一般默认就行: Last sector, +/-sectors or +/-size{K,M,G,T,P} (2145486848-2147483647, default 2147483647): 2147483647 Created a new partition 2 of type 'Linux' and of size 975 MiB.现在我们通过按 t 来更改其类型,指定分区 2 和代码 82 进行转换分区类型: Command (m for help): t Partition number (1,2, default 2): 2 Hex code or alias (type L to list all): 82 Changed type of partition 'Linux' to 'Linux swap / Solaris'.转换分区类型后看到的结果: Command (m for help): p Disk /dev/sda: 1 TiB, 1099511627776 bytes, 2147483648 sectors Disk model: Virtual disk Units: sectors of 1 * 512 = 512 bytes Sector size (logical/physical): 512 bytes / 512 bytes I/O size (minimum/optimal): 512 bytes / 512 bytes Disklabel type: dos Disk identifier: 0x500f2a57 Device Boot Start End Sectors Size Id Type /dev/sda1 * 2048 81885183 81883136 39G 83 Linux /dev/sda2 2145486848 2147483647 1996800 975M 82 Linux swap / Solaris保存所做的更改: Command (m for help): w The partition table has been altered. Syncing disks.在这之后,我们可以创建一个交换(指定您的新交换分区),通过如下命令获取盘符的 UUID root@localhost:~# mkswap /dev/sda2 Setting up swapspace version 1, size = 975 MiB (1022357504 bytes) no label, UUID=28131458-4fd7-4a59-b7c9-4d5dc01707cc复制上一步获取的 UUID ,更新 /etc/fstab 文件为交换分区设置新的 UUID : root@localhost:~# vi /etc/fstab4图片 启动交换分区 root@localhost:~# swapon /dev/sda2扩展分区 进入 fdisk /dev/sda 输入 p 查看磁盘分配 root@localhost:~# fdisk /dev/sda Welcome to fdisk (util-linux 2.36.1). Changes will remain in memory only, until you decide to write them. Be careful before using the write command. ommand (m for help): p Disk /dev/sda: 1 TiB, 1099511627776 bytes, 2147483648 sectors Disk model: Virtual disk Units: sectors of 1 * 512 = 512 bytes Sector size (logical/physical): 512 bytes / 512 bytes I/O size (minimum/optimal): 512 bytes / 512 bytes Disklabel type: dos Disk identifier: 0x500f2a57 Device Boot Start End Sectors Size Id Type /dev/sda1 * 2048 81885183 81883136 39G 83 Linux /dev/sda2 2145486848 2147483647 1996800 975M 82 Linux swap / Solaris您可以有其他分区。主要的是在我们想要扩展的分区之后有空闲扇区。为了做到这一点,在上一节中,我们将交换分区移动到磁盘的末尾。我们得到 sda1 在扇区 81885183 处结束,下一个分区 sda2 在 52145486848 处开始,它们之间有空闲扇区。如果磁盘上有一个分区或者是最后一个分区,那么您需要查看分区( 81883136 )和磁盘( 2145486848 )的最后一个扇区。 要扩展分区,必须首先删除有关它的信息。为此,输入 d 并指定分区( 1 /dev/sda1 ): Command (m for help): d Partition number (1-2, default 2): 1 Partition 1 has been deleted.创建新分区 Command (m for help): n Partition type p primary (1 primary, 0 extended, 3 free) e extended (container for logical partitions) Select (default p): Using default response p. Partition number (1,3,4, default 1): 1 First sector (2048-2145486847, default 2048): Last sector, +/-sectors or +/-size{K,M,G,T,P} (2048-2145486847, default 2145486847): Created a new partition 1 of type 'Linux' and of size 1023 GiB. 系统会询问是否删除当前文件选择 N 不删除,然后输入 w 保存更改 # 此处不要选 y Do you want to remove the signature? [Y]es/[N]o: n Command (m for help): w The partition table has been altered. Syncing disks.重启系统,此处也可以不操作,有条件建议重启一下。 root@localhost:~# reboot调整 ext4 文件系统的大小 resize2fs /dev/sda1 root@localhost:~$ resize2fs /dev/sda1 resize2fs 1.46.2 (28-Feb-2021) Filesystem at /dev/sda1 is mounted on /; on-line resizing required old_desc_blocks = 5, new_desc_blocks = 128 The filesystem on /dev/sda1 is now 268185600 (4k) blocks long.通过 df -h 可以验证磁盘已经扩展成功 root@localhost:~$ df -h Filesystem Size Used Avail Use% Mounted on udev 7.9G 0 7.9G 0% /dev tmpfs 1.6G 616K 1.6G 1% /run /dev/sda1 1007G 4.2G 962G 1% / tmpfs 7.9G 0 7.9G 0% /dev/shm tmpfs 5.0M 0 5.0M 0% /run/lock tmpfs 1.6G 0 1.6G 0% /run/user/1000参考 debian-11-extend-partition